Categories
Tags
-
#air compressor
#Double Wire Fence
#Malleable Iron Pipe Fittings
#hollow brick machine
#Filter Press
#laminate wood flooring
#seamless steel pipe
#Current Transformer
#Eccentric Butterfly Valve
#Aluminum Casting
# Control Valve Market
#adult diapers
#four way pipe fitting
#block machine for sale in usa
#24 inch butterfly valve
#8 inch butterfly valve
#8 inch butterfly valve price
#black pipe y fitting
#China non woven fabric Supplier
#monitor wa fire
#underground gate valve
#China Sprocket supplier
#office table for 4 person
#Automatic Filter Presses
#door manufacturers in china
#China wholesale iron doors manufacturers
#1610 co2 Non-metallic laser cutting machine for wood
#China Adult diaper pants manufacturer
#glass office partition walls
#china pipe fitting
#filter press plate
#silicone heater hose
#CATERPILLAR Excavator Carrier Roller
#China wet wipes manufacturing machine
#China ceramic fiber blanket manufacturer
#pallet coil nails
#Newly Designed Wafer Butterfly Valves for Long Life-Period
#membrane switch supplier
#8 pump
#adult diaper websites
#L-muscone supplier price in China
#French Exterior Double Glass Wrought Iron Doors
#ECO Customized Colors Personalized Grocery Bag PP Nonwoven Flat Bag
#silicone tubing suppliers
#cubicle desk organizer
#Steel Bar Grating manufacturer
#HITACHI EX120 Excavator Undercarriage Part Carrier Roller
#Partition Workstation hot sale in China
#membrane switch panels
#Excavator Undercarriage Part Carrier Roller
#cnc wood carving machine
#China Baby diaper pants factory
#coat buttons metal supplier
#ceramic fire board
#China 11.2 inch 20 gauge fine wire staples
#heart shaped pin badges clasp
#reflective road studs supplier
#china office table prices
#180 Degrees Silicone Hose
#triple offset butterfly valve
#China best wet wipes for face manufacturer
#baby diaper online sale
#wall saw blade
#aluminum silicate ceramic
#vacuum formed shapes
#China fiber laser cleaning machine for sale
#beauty bag factories
#carrier roller suppliers
#China danfoss h1b suppliers
#the maker mini laser engraver
#black pipe fitting
#custom metal tags for clothing
#6 piece bedding set
#China L-muscone supplier price
#Fiber laser machine manufacturers
#plush bath towels,white wash cloths,white wash cloth,100 cotton towels,organic washcloths wholesale
#cozy blanket,woven blankets,Green Throw Blanket,purple velvet throw blanket
#gray bedding set,Halloween Bedding Set,cartoon bedding sets,Bohemian Bedding Set
#parker pv080 piston pump
#china rod ends manufacturer
#servo hydraulic testing machine
#best metal laser engraver
#rollers for track
#china car part manufacturers
#China brick machines
#plastic coated chicken wire
#China KOMATSU PC300-7 Excavator Undercarriage Part Carrier Roller
#traffic cone manufacturers
#China adult diaper manufacturer
#non rising stem resilient seated gate valve
#reslient seat gate valve
#HITACHI DX370 Excavator Undercarriage Part Sprocekt
#Nonwoven Tote Bag
#china Φ20 Rain Hose 0.15mm supplier
#Isobutylbenzene supplier
#china fire foam monitor manufacturer
#raised reflective pavement markers
#engine crane
#bi pipe fittings
#heavy piece of metal with tag
#excavator track rollers for sale
#fire ground monitor
#wipes packaging
#high speed adult diaper machine
#diaper machine manufacturers
#polytunnel greenhouse
#soy sauce
#90903 63014
#fire sprinkler fittings
#drill bit spanish
#China overhead bridge crane
#Jingjin filter press
#black industrial piping
#reflective studs
#diaper machine story
#galvanized tee fittings
#portable track press
#China Alkanes suppliers
#wall cutting blade
#ceramic tile cutter blade
#lug vs wafer butterfly valve
#GI Pipe fittings
#upper track rollers for sale
#cnc leather
#flash point of oil
#generator radiator
#vibration knife cutting systems
#electric hoist
#floor jack
#bspt vs npt
#palet jack
#diaper procedure
#auto transmission temperature sensor
#field fence for goats
#concrete core bits
#manual chain hoist
#open cup flash point
#erw pipe
#waist bag outdoor
#marble cutting blade
#wholesale music instruments
#fiberglass cutting machine
#fire sprinkler control valve
#concrete cutting blade
#drum sets
#nappy making machine
#track tensioner assembly
#brushless motor drawing
#bulldozer track
#cellular health supplement
#fire sprinkler check valve
#Miniature Bed
#oliver valves
#sling
#Manual Fire Water Monitor
Archives
How to change the drive sprocket on an excavator?
-
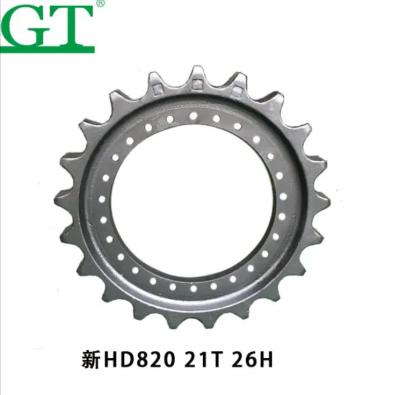
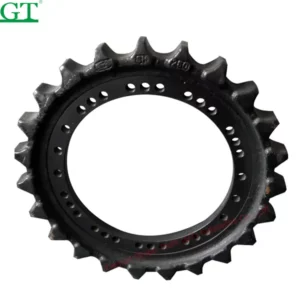
What Is a Drive Sprocket and Why Replace It
The excavator sprocket drives the track chain. It meshes with chain links and pins. It transfers power from final drive. Over time teeth wear down, deform, or drop off. Worn sprocket causes track slippage, faster wear on chain, rollers. Replacing the sprocket gives better track life and smoother operation. It saves undercarriage cost long term.
Safety First Before You Begin
Park excavator on flat level ground. Lower boom and blade. Use lockouts to disable hydraulics. Wear gloves, eye protection, steel boots. Use jack stands or blocks so machine does not shift. Remove ignition or key. Ensure you have space around undercarriage. Safety prevents injuries.
Tools and Parts You Will Need
You need correct tools and replacement components:
-
Socket set and breaker bar
-
Torque wrench
-
Hammer or rubber mallet
-
Pry bars and chisels
-
Penetrating oil
-
Replacement drive nuts and bolts
-
The new sprocket that matches model
-
Weld-on or bolt-on segment (if undercarriage design uses segments)
Inspecting the Old Excavator Sprocket
Before removal, inspect the old sprocket: tooth tip shape, root, wear pattern. Compare wear to chain pitch. If chain is too loose, sprocket wear often severe. Check for cracks or broken teeth. Also check final drive hub and spline. Clean grease and debris so you see condition. That inspection helps ensure you buy correct replacement.
Removing Track Tension
Loosen the track. Use the track adjuster to release tension on track chain. Let chain sag slightly. You may need to back off adjuster grease valve. Wait until track moves freely. This step reduces stress during sprocket removal. If track stays tight, sprocket removal risks damage or injury.
Lifting or Supporting the Excavator
Raise excavator on blocks or jack stands. Use the machine’s blade or boom to lift and stabilize undercarriage. Make sure weight is supported safely. Do not work under unsupported machine. Raise enough so sprocket is accessible. Maintain stability.
Removing the Old Sprocket Bolts
Spray penetrating oil on nuts and bolts. Let sit. Use breaker bar to break loose. If bolts are corroded, tap gently with hammer to loosen. Remove each bolt gradually. Don’t force one bolt too hard before loosening others. Use correct socket size. Keep removed bolts in safe place.
Extracting the Old Sprocket
Once bolts are removed, you may need to pry sprocket off hub. Use pry bars gently. If stuck, use gentle tapping around hub flange. Avoid damaging hub or final drive. Sometimes a soft-hammer knocks sprocket off. Clean the hub surface after removal. Remove all rust or debris.
Cleaning and Preparing the Hub Surface
Wire brush or file hub flange surface. Clean old gasket or sealant. Remove rust, paint, grime. Replace any old gasket material if required. Ensure spline and bolt surfaces are flat and clean. Proper mating surface ensures new sprocket aligns well and bolts seat correctly.
Fitting Replacement Sprocket (Bolt-On or Segment)
Place new sprocket onto the drive hub. Align bolt holes correctly. If your excavator uses sprocket segments (sprocket segment design), install all segments evenly. Make sure segment seams match. Use bolt-on type if full sprocket. For segmented sprocket, install all segments before tightening.
Torquing Bolts to Specification
Tighten bolts in star or cross pattern. Bring bolts to snug first. Then torque to manufacturer value. If no spec sheet, use general torque table for excavator size. Tighten gradually. Over-tightening warps sprocket; under-tightening loosens under load.
Table: Example Torque Values by Excavator Size
Excavator Size (ton) Typical Bolt Count Sample Bolt Torque (ft-lb) 5-10 ton 8 bolts ~150-200 ft-lb 20-30 ton 10 bolts ~300-400 ft-lb 40-50 ton 12 bolts ~500-650 ft-lb Use this table only as guide. Always check your machine manual.
Re-Tensioning the Track Chain
After sprocket installation, re-tension track chain. Use track adjuster. Tighten until correct sag per spec. Too loose causes derailment. Too tight causes strain on sprocket and track pins. Check both sides equally. Operate machine slowly to let chain settle.
Lubrication and Greasing After Change
Grease hub bolts if required. Lubricate final drive seals if needed. Ensure grease holes are clean. Use proper grease type. Grease helps prevent rusting and seizure of bolts.
Testing the New Sprocket Under Load
Lower excavator from supports. Move machine over flat hard ground slowly. Observe track motion. Listen for skipping or slipping. Inspect bolt tightness again after few hours of operation. Check for misalignment or abnormal vibration.
Preventing Rapid Wear
Wear on sprocket arises from dirty track, mis-tensioned chain, hardened pins. Clean track daily. Remove debris. Tension track correctly. Replace worn chain or rollers when needed. Keep undercarriage parts aligned.
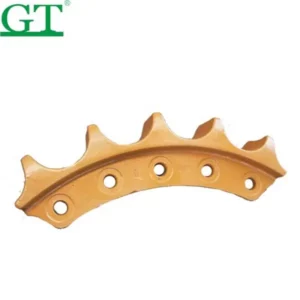
Segment vs Full Sprocket Replacement
Some excavator sprocket designs use segments that bolt together. Segment replacement saves cost if only partial wear. Full sprocket replacement gives uniform performance. But replacing segments requires precision. Each segment must align; bolts torqued evenly.
Safety Precautions During Replacement
Always support machine well. Use proper gloves, eye protection. Keep hands away from pinch points. Use proper lifting gear for heavy sprocket parts. Do not rush. If parts hot from operation, wait to cool. Keep spectators out of work area.
What Can Go Wrong and How to Avoid Issues
Bolt breakage: use correct torque, good bolts. Misalignment: ensure hub face clean. Track tension wrong: causes skipping or wear. Loose segments: torque properly and inspect regularly. Rust and corrosion: keep parts clean and greased.
Maintenance after Installation
Check sprocket bolts weekly for first hours. Inspect teeth after working in abrasive conditions (rock, sand). Monitor track links and rollers for joint wear. Keep undercarriage lubrication good. Replace chain or rollers when they show wear so sprocket does not wear unevenly.
Quality of Replacement Part Matters
Choose proper material. Heat treatment adds hardness to tooth faces. Durability resists wear and impact. Good finishing reduces sharp corners which cut track pins. Using low quality sprocket leads to early failure. Ensure replacement matches OEM specs or approved aftermarket.
Cost and Time Factors
Replacing excavator sprocket takes labor time. Time depends on machine size, undercarriage design, access. Cost includes new sprocket or segments, bolts, tools, labor. Better investment now reduces cost later from undercarriage damage.
Environmental and Working Conditions Impact
Working in mud, sand, abrasives speeds wear. Working in wet conditions causes rust which seizes bolts. Cold weather makes steel brittle. Hot weather expands parts. Plan sprocket change during favorable weather when possible. Clean parts often.
Planning the Job Well
Get parts and tools ready before starting. Read service manual. Mark parts and positions where needed. Photograph current setup to help reassembly. Ensure you have torque specs. Clear working space. Ensure safe lifting.
Summary
You inspected old part, removed track tension, lifted and supported machine. You removed bolts, pulled old sprocket, cleaned hub. You fitted new sprocket or segments, torqued bolts, re-tensioned track. You tested under load. You planned maintenance to prevent early wear.
-