Adelina Martin
@qbsenterprisesupportAdelina Martin
Updates
Info
Personal Information
- First Name Adelina
- Last Name Martin
- Gender Female
- Birthday August 22, 1991
Contact Information
Personal Details
- About Me Hi, my name is Adelina Martin. I am currently working as a Microsoft certified technician and QuickBooks accounting software ProAdvisor from the last past 3 years.
Blogs
Posted December 1, 2021
QuickBooks error code C=1304 is seen when the users update QuickBooks or install any program. With this error ...
Posted May 3, 2021
QuickBooks error code 15106 is usually seen when the user updates the program. This error indicates that the u...
Posted March 17, 2021
Want to install multiple QuickBooks desktop versions on one system? Well, here we have got you covered. In thi...
Posted November 3, 2020
While trying to open QuickBooks or a company file, the user might end up in the QuickBooks error code 80029c4a...
Posted November 2, 2020
The user can resolve the error by rebuilding the company file. The user will have to carry out the onscreen in...
Forum Posts
-
Posted in the topic Resolve QuickBooks Error Code 6000 95 (Advanced Methods) in the forum TechnologyDecember 12, 2024 7:48 AM EST
QuickBooks error code 6000 95 is seen with an error message stating “QuickBooks error code 6000 95. We’re sorry. QuickBooks encountered a problem”. This error is seen due to restoring of a company file. It is also seen when the file the user is trying to restore is still present on the flash drive and QuickBooks does not find permission to read from the media device. This error is basically a part of 6000 error series.

If you are also facing this QuickBooks error code 6000 95, then in that case, you can read this post till the end. Or you can also call us at our toll-free customer support number 1-800-761-1787, and speak to our team of professionals. They will resolve the error for you without any further mess.
What leads to the QuickBooks error 6000 95?
The user can end up in QuickBooks error 6000 95 due to the following factors:
- QuickBooks error can be seen at the time of conversion of the accountant’s copy transfer file to the accountant copy. The user might face this issue when the windows operating system is corrupted
- Also, when the system process slows down in QuickBooks such as it may require a further period of time to open any program and response with a delayed time
- In case you are handling multiple applications at the same time, the system will result in sluggish execution.
Steps to fix QuickBooks error 6000 95
The user can follow the steps below to resolve the QuickBooks error code 6000 95:
- The user needs to start the system and move to the admin, and then move to the start option and click on all programs from accessories, system tools and click on the system restore.
- From another new window option, the user needs to select to restore my computer to an earlier time. After that move to the option and move to next. The user must select the most recent system restore point and move to the next in configuration window and reboot the system to complete the process
- The user needs to ensure that QuickBooks is up to date. It is key to always maintain the backup or a portable file directly from QuickBooks local folder
- In case you are restoring from the file server, then the user just need to copy the file from a file server to the system device with QuickBooks
-
Posted in the topic QuickBooks Something’s Not Quite Right Error - How to Fix It? in the forum TechnologyDecember 2, 2024 6:54 AM EST
The 'QuickBooks Something's Not Quite Right error' is often caused by data integrity issues. It means there might be problems with the information stored. This error message notifies users about possible issues within the company file, which can arise from damaged transactions, corrupted files, or data that doesn't match up correctly.
To avoid the error users should regularly back up and maintain data on QuickBooks. In this article, we've explained solutions for the Something’s Not Quite Right error in QuickBooks.

The main reasons behind QuickBooks’s Something’s Not Quite Right error
It's essential to understand and check these causes using proper troubleshooting and maintenance practices to prevent and fix the Something’s Not Quite Right error in QuickBooks,
- This error can be triggered by damaged or corrupted data within the company file.
- Issues may arise due to unfinished transactions or entries that are improperly saved.
- Errors can occur because of connectivity problems or disruptions in the network during data exchange.
- Unexpected errors can appear from bugs within the QuickBooks software.
- Compatibility problems may arise due to incomplete or failed software updates.
If you understand and address these causes with proper troubleshooting and maintenance practices, you can prevent and resolve such errors.
Solutions to Fix QuickBooks Something’s Not Quite Right error
In this article, we have learned the reasons behind the QuickBooks Something’s Not Quite Right error. Below we have given the troubleshooting methods to fix the problem:
Solution 1: Reset QuickBooks Application Data to Fix this Error
Resetting QuickBooks app data can help fix the ‘Something’s not quite right’ error. Follow the below steps
- First close QuickBooks on your computer.
- Create a backup of your company files and important data.
- Find the QuickBooks app data folder based on your operating system, such as 'QBO' or 'QB Desktop.'

- Rename or delete these folders by adding '_old' to their names.
- When you reopen QuickBooks, it will recreate the necessary app data folders with default settings.
- Now modify your preferences, settings, and account information in QuickBooks again.
- Use QuickBooks as usual and check if the ‘Something’s not quite right’ error still happens.
Solution 2: Test in Different Browsers Incognito Mode
QuickBooks users should know whether the error is due to browser issues or not. So to identify this, you should try to browse in incognito mode in different browsers. Just follow the below procedures.
- First, open the Google Chrome
- Click on the three-dot menu in the top-right corner
- Choose "New Incognito Window" or type Ctrl+Shift+N on the keyboard.

- Once the incognito window is open, type in the QuickBooks web address
- If required, login to your QuickBooks account within the incognito window.
- Perform a few tasks in QuickBooks that were causing issues or errors previously.
- Check whether the "Something's not quite right" error or any other issues occur while using QuickBooks in incognito mode.
- Once you've completed testing, you can close the incognito window. It clears any temporary browsing data associated with that session.
Solution 3: Delete Your Browsers Cache and Cookies
Google Chrome:
- Open Chrome and click on the three-dot menu in the top-right corner.
- Select "More tools” and click on "Clear browsing data."
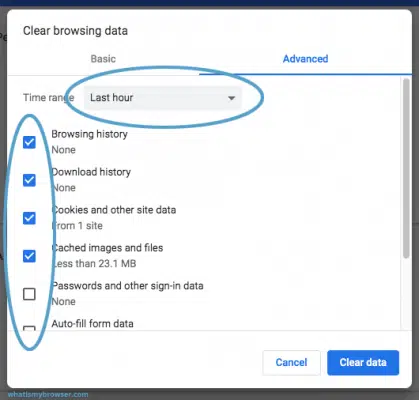
- Now, choose the time range you want to clear
- Check the boxes "Cookies and other site data" and "Cached images and files."
- Click on "Clear data" to erase the particular items.
Mozilla Firefox:
- Open Mozilla Firefox and click on the three-line menu in the top-right corner.
- Select "Options" and click on "Privacy & Security" from the left sidebar.
- Go down to the "Cookies and Site Data" menu
- Now, click on "Clear Data."
- Check the boxes next to "Cookies and Site Data" and "Cached Web Content."
- Click on "Clear" to erase the particular items.
Microsoft Edge:
- Open Microsoft Edge and click on the three-dot menu in the top-right corner.
- Click on "Settings" and choose "Privacy, search, and services"
- Click on "Clear browsing data"
- Check the boxes “Cookies and other site data" and "Cached images and files."
- Now click on "Clear now" to remove the junk files
-
Posted in the topic Fix QuickBooks Intuit Data Protect Backup Failed Backup Error 2277 in the forum TechnologyNovember 27, 2024 8:53 AM EST
Regularly backing up the company data is important to avoid accidental data loss. QuickBooks users need to back up the company data securely and, it is an easy process too. But this simple process is also disrupted by some serious errors, one among them is QuickBooks error message 2277, leaving an error message on your desktop screen.
This error is caused by a partial or wrong backup of the company data. If you are also annoyed by this kind of error in your QuickBooks desktop, then you must read this article. Here, we have in-depth causes and solutions for QuickBooks error 2277.
Reasons for the QuickBooks Backup Error Code 2277
While analysing the QuickBooks backup error code 2277, we can conclude the following few factors which is responsible for this problem.
- The main reason behind the error code 2277 is the partial and unsuccessful backup of company files.
- Some of the company files get corrupted while backing up the files.
- You might not have installed recent QuickBooks updates on your system.
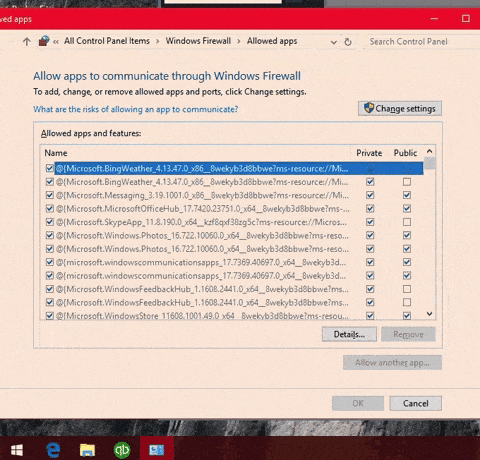
- In some cases, Windows firewall restricts QuickBooks desktop.
- If you have not cleared the junk files on your computer, which are stored in the form of cookies, caches, and temporary internet files.
Pro solutions to tackle QuickBooks error code 2277
The solutions mentioned below are discussed by certified professionals to fix QuickBooks error code 2277 easily. But, you should follow the given instructions without any mistakes.
Method 1: Take the help of the IDP Diagnostic tool
- Click on the System Tray icon at the bottom right corner of the desktop, and then right-click on the IDP icon.
- Select the option "About Intuit Data Protect" and press the F2 + Ctrl keys. Here comes the Intuit Data Protect Diagnostics Tool.
- Within the Diagnostics Tool, click on the "Run Diagnostics" button to identify any issues preventing successful backups with IDP.
- Once the tool identifies problems, you should manually fix them by addressing issues with both software and hardware configurations.
- Afterward, reconfigure the Windows firewall and any third-party security applications.
- In case you are using third-party security applications add the following files to the exception list:
- C:\Program Files(X86)\Common Files\Intuit\Data Protect\IntuitDataProtect.exe
- C:\Program Files(X86)\Common Files\Intuit\Data Protect\IbuEnghost.exe
- C:\Program Files(X86)\Common Files\Intuit\Data Protect\QBIDPServices.exe
- After successfully adding the above files to the exception list, try to back up your data again to see if the error 2277 is rectified. If the issue continues, continue to the next troubleshooting step.
Method 2: Add Windows Firewall ports
- Go to the start button and open the control panel.
- Scroll to the security section and click on the system settings.
- Next, choose windows firewall and continue to advanced settings.

- Under the advanced settings, choose inbound rules.
- Select New Rules to create a new rule.
- Enter the specific ports you want to add, and then click on next to finish the process.
Method 3: Add trusted sites in Internet Explorer
- Open Internet Explorer.
- Go to Tools and then select Internet Options.
- Now, go to the Security tab and uncheck the Enable Protected Mode box.

- Select the Trusted Sites zone and click on Sites.

- Clear the checkbox for server verification for all sites listed.
- Add reliable sites to the list, such as *.backup.com, *.intuit.net, and *.intuit.com, then click Close.
- Next, select the Privacy tab and choose Sites.
- Enter the following websites in the Address Website box: *quickbooks.com and *intuit.com.
- After adding each web address, click on the Allow button.
- Now click OK to finish the process.
-
Posted in the topic How to fix QuickBooks detected PDF component missing error? in the forum TechnologyNovember 26, 2024 5:14 AM EST
QuickBooks Desktop is a popular accounting software, used to complete financial tasks in the company. It can create PDFs of reports, invoices other documents. Sometimes, you might get a QuickBooks PDF Component Missing Error. This means QuickBooks can’t find something that supports to make PDFs. QuickBooks usually looks for ‘XPS Document Writer’, it is a virtual printer used for making XPS files and later QuickBooks turns it into PDFs.

What can be the Causes of QuickBooks PDF Component Missing Error?
The missing PDF component in QuickBooks can happen due to different reasons:
- QuickBooks might be outdated or damaged.
- There could be problems with the Microsoft XPS Document Writer used by QuickBooks.
- Windows settings or permissions might be set up incorrectly, causing issues with PDF creation.
- Third-party apps or security software might be causing interference.
Effective Solutions for QuickBooks PDF Component Missing Error
Checkout the following effective solution that can be help us to rectify the QuickBooks detected PDF component missing issue:
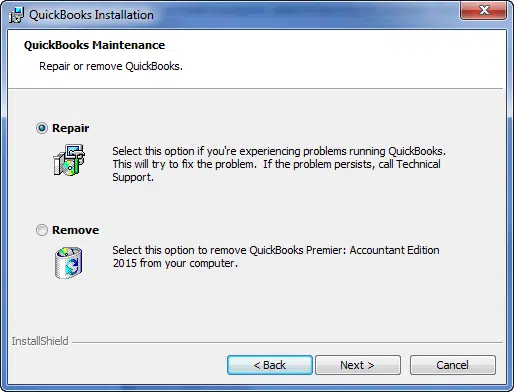
Method 1: Repair QuickBooks desktop
- Open the Windows Control Panel.
- Click on 'Programs and Features.'
- Find QuickBooks in the list and select it.

- Click on ‘Repair’ and follow the instructions to finish the repair process.
Method 2: Check Your PDF Converter
We have given the steps to check Your PDF Converter
- Open the 'Printers and Faxes' window on your computer.
- If you see QuickBooks PDF Converter there, try making a PDF file again.

- If the PDF file is still missing, reinstall the PDF converter.
- Reinstall Microsoft XPS Document Writer:
- Download Windows 7 XPS Document Writer drivers.
- Extract the downloaded files.
- Copy and paste the extracted folder to C:\Windows\System32.
- Press the Windows key + r to open the Run command box.
- Type Control.exe Printers and click OK.
- Right-click on Microsoft XPS Document Writer and choose "Remove Device."
- Click on "Add a Printer."
- Choose "A printer that wasn’t listed."
- Select "Add a local printer with manual settings" and click next.
- Choose "Create a new port" with Local port as the option.
- Name the port as XPS and click OK.
-
Posted in the topic How to fix QuickBooks detected PDF component missing error? in the forum TechnologyNovember 26, 2024 5:14 AM EST
QuickBooks Desktop is a popular accounting software, used to complete financial tasks in the company. It can create PDFs of reports, invoices other documents. Sometimes, you might get a QuickBooks PDF Component Missing Error. This means QuickBooks can’t find something that supports to make PDFs. QuickBooks usually looks for ‘XPS Document Writer’, it is a virtual printer used for making XPS files and later QuickBooks turns it into PDFs.
What can be the Causes of QuickBooks PDF Component Missing Error?
The missing PDF component in QuickBooks can happen due to different reasons:
- QuickBooks might be outdated or damaged.
- There could be problems with the Microsoft XPS Document Writer used by QuickBooks.
- Windows settings or permissions might be set up incorrectly, causing issues with PDF creation.
- Third-party apps or security software might be causing interference.
Effective Solutions for QuickBooks PDF Component Missing Error
Checkout the following effective solution that can be help us to rectify the QuickBooks detected PDF component missing issue:
Method 1: Repair QuickBooks desktop
- Open the Windows Control Panel.
- Click on 'Programs and Features.'
- Find QuickBooks in the list and select it.
- Click on ‘Repair’ and follow the instructions to finish the repair process.
Method 2: Check Your PDF Converter
We have given the steps to check Your PDF Converter
- Open the 'Printers and Faxes' window on your computer.
- If you see QuickBooks PDF Converter there, try making a PDF file again.
- If the PDF file is still missing, reinstall the PDF converter.
- Reinstall Microsoft XPS Document Writer:
- Download Windows 7 XPS Document Writer drivers.
- Extract the downloaded files.
- Copy and paste the extracted folder to C:\Windows\System32.
- Press the Windows key + r to open the Run command box.
- Type Control.exe Printers and click OK.
- Right-click on Microsoft XPS Document Writer and choose "Remove Device."
- Click on "Add a Printer."
- Choose "A printer that wasn’t listed."
- Select "Add a local printer with manual settings" and click next.
- Choose "Create a new port" with Local port as the option.
- Name the port as XPS and click OK.