Categories
Tags
-
#air compressor
#Double Wire Fence
#Malleable Iron Pipe Fittings
#hollow brick machine
#Filter Press
#laminate wood flooring
#seamless steel pipe
#Current Transformer
#Eccentric Butterfly Valve
#Aluminum Casting
# Control Valve Market
#adult diapers
#four way pipe fitting
#block machine for sale in usa
#24 inch butterfly valve
#8 inch butterfly valve
#8 inch butterfly valve price
#black pipe y fitting
#China non woven fabric Supplier
#monitor wa fire
#underground gate valve
#China Sprocket supplier
#office table for 4 person
#Automatic Filter Presses
#door manufacturers in china
#China wholesale iron doors manufacturers
#1610 co2 Non-metallic laser cutting machine for wood
#China Adult diaper pants manufacturer
#glass office partition walls
#china pipe fitting
#filter press plate
#silicone heater hose
#CATERPILLAR Excavator Carrier Roller
#China wet wipes manufacturing machine
#China ceramic fiber blanket manufacturer
#pallet coil nails
#Newly Designed Wafer Butterfly Valves for Long Life-Period
#membrane switch supplier
#8 pump
#adult diaper websites
#L-muscone supplier price in China
#French Exterior Double Glass Wrought Iron Doors
#ECO Customized Colors Personalized Grocery Bag PP Nonwoven Flat Bag
#silicone tubing suppliers
#cubicle desk organizer
#Steel Bar Grating manufacturer
#HITACHI EX120 Excavator Undercarriage Part Carrier Roller
#Partition Workstation hot sale in China
#membrane switch panels
#Excavator Undercarriage Part Carrier Roller
#cnc wood carving machine
#China Baby diaper pants factory
#coat buttons metal supplier
#ceramic fire board
#China 11.2 inch 20 gauge fine wire staples
#heart shaped pin badges clasp
#reflective road studs supplier
#china office table prices
#180 Degrees Silicone Hose
#triple offset butterfly valve
#China best wet wipes for face manufacturer
#baby diaper online sale
#wall saw blade
#aluminum silicate ceramic
#vacuum formed shapes
#China fiber laser cleaning machine for sale
#beauty bag factories
#carrier roller suppliers
#China danfoss h1b suppliers
#the maker mini laser engraver
#black pipe fitting
#custom metal tags for clothing
#6 piece bedding set
#China L-muscone supplier price
#Fiber laser machine manufacturers
#plush bath towels,white wash cloths,white wash cloth,100 cotton towels,organic washcloths wholesale
#cozy blanket,woven blankets,Green Throw Blanket,purple velvet throw blanket
#gray bedding set,Halloween Bedding Set,cartoon bedding sets,Bohemian Bedding Set
#parker pv080 piston pump
#china rod ends manufacturer
#servo hydraulic testing machine
#best metal laser engraver
#rollers for track
#china car part manufacturers
#China brick machines
#plastic coated chicken wire
#China KOMATSU PC300-7 Excavator Undercarriage Part Carrier Roller
#traffic cone manufacturers
#China adult diaper manufacturer
#non rising stem resilient seated gate valve
#reslient seat gate valve
#HITACHI DX370 Excavator Undercarriage Part Sprocekt
#Nonwoven Tote Bag
#china Φ20 Rain Hose 0.15mm supplier
#Isobutylbenzene supplier
#china fire foam monitor manufacturer
#raised reflective pavement markers
#engine crane
#bi pipe fittings
#heavy piece of metal with tag
#excavator track rollers for sale
#fire ground monitor
#wipes packaging
#high speed adult diaper machine
#diaper machine manufacturers
#polytunnel greenhouse
#soy sauce
#90903 63014
#fire sprinkler fittings
#drill bit spanish
#China overhead bridge crane
#Jingjin filter press
#black industrial piping
#reflective studs
#diaper machine story
#galvanized tee fittings
#portable track press
#China Alkanes suppliers
#wall cutting blade
#ceramic tile cutter blade
#lug vs wafer butterfly valve
#GI Pipe fittings
#upper track rollers for sale
#cnc leather
#flash point of oil
#generator radiator
#vibration knife cutting systems
#electric hoist
#floor jack
#bspt vs npt
#palet jack
#diaper procedure
#auto transmission temperature sensor
#field fence for goats
#concrete core bits
#manual chain hoist
#open cup flash point
#erw pipe
#waist bag outdoor
#marble cutting blade
#wholesale music instruments
#fiberglass cutting machine
#fire sprinkler control valve
#concrete cutting blade
#drum sets
#nappy making machine
#track tensioner assembly
#brushless motor drawing
#bulldozer track
#cellular health supplement
#fire sprinkler check valve
#Miniature Bed
#oliver valves
#sling
#Manual Fire Water Monitor
Archives
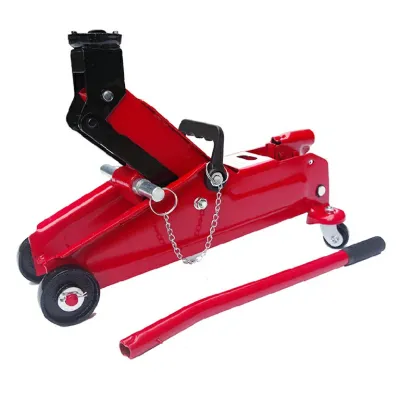
How to fill a hydraulic floor jack?
-
Understanding how to operate a floor jack safely and efficiently is extremely important for car owners. One of the most crucial parts of it is adding the oil to the hydraulic floor jack. Appropriate filling makes the jack fluid and thus, the jack can live longer. Thus, the guidelines that will be given in the below context would be the filling of the oil tank of your hydraulic floor jack, where you take the stage of the process.

Step 1: Get Ready the Necessary Equipment
Take the time to find all the tools you need to start the job:
- Hydraulic fluid (you must check your manual to see which type you need)
- A funnel
- A clean cloth
- A pair of rubber gloves
Step 2: Make an Inspection of the Jack
Prior to carrying out the filling of the hydraulic floor jack, ensure that the floor jack has no leaks, damage, or any other issues. It would involve touching hoses and seals to see if you can notice any wear and tear. If any problems show up, it's wise to deal with them first.
Step 3: Find the Spot of the Jack for the Purpose of Adding Oil
Be clear about where the fill port is located on your jack. It's easiest to find near the pump handle. Make very sure that the port remains clean as you gently lift the cap from it so that no dirt or dust gets in.
Step 4: Pour Oil Into the Reservoir
Use the funnel to let the hydraulic oil drain directly into the fill port. Be slow with the filling and avoiding splashes. Thus, be cautious about the fluid level as you are refilling, and don't forget to keep a little space for the fluid to expand.
Step 5: Look for Air Bubbles
Once the filling is complete, pump the handle of the jack several times. Such an action is used for producing the liquid flow and the ejection of any air presenting in the form of bubbles. If the presence of air is visible to you within the container, continue pumping until you can't see the air bubbles anymore.
Step 6: Put Back on the Cap
Once you have completed the process of covering the jack's lid with the oil and getting rid of the air bubbles, just put the lid back on by screwing it on firmly. If the oil has spilled, use a clean cloth to wipe it away in order to avoid any possible falls.
Step 7: Inspection of the Jack
It is important to test the hydraulic floor jack before you start using it to make sure it is working well. Please work the lever and if there is a strange noise or resistance, stick out the failure. If everything seems correct, then the jack is ready for you to use.
Conclusion
Hydraulic floor jacking is an easy procedure. By following the steps, you ensure not only the effective operation of your jack but also your safety. Doing regular cleaning, such as inspecting and filling the hydraulic fluid, is a key part of the treatment. Always keep safety as your first priority during lifting equipment use.