Parry Smith
@parrysmithParry Smith
Updates
Info
Personal Information
- First Name Parry
- Last Name Smith
- Gender Female
- Birthday November 17, 1991
Contact Information
- Website http://qbsenterprisesupport.com/
- Twitter Parrysmith5
Personal Details
- About Me Hi, I am Parry Smith. We provide the finest possible QuickBooks support services.We own a pool of experts who work round the clock to provide assistance to all QuickBooks users.
Forum Posts
-
Posted in the topic How to Reinstall QuickBooks PDF Converter in Easiest Steps? in the forum TechnologyDecember 23, 2021 1:16 AM EST
Want to learn the process to reinstall the QuickBooks PDF converter? Read this post till the end, and find the right steps to be performed. QuickBooks PDF converter is basically a built-in feature that converts QuickBooks reports and forms into Adobe portable document format files. At times, the user might face some issue with the pdf converter, which might demand the user to reinstall the same.
Thus, this post is going to talk about the steps involved in reinstalling the QuickBooks PDF converter successfully. However, if you don’t want to perform the steps manually, then make sure to call us and our team professionals will ensure to provide you with the best assistance possible.
Steps for reinstalling QuickBooks pdf converter
The user can perform the below stated steps for reinstalling QuickBooks pdf converter:
- The very first step is to delete and reinstall the QuickBooks PDF converter
- And then log in to windows as an admin and open printers and faxes
- The next step is to search QuickBooks pdf converter and then right click the delete option
- The user should now choose delete
- And hit ok button.
- The next step is to download the pdf converter
o The user should right click the QuickBooks option and choose properties
o After that, select find target, windows explorer will open
o The next step is to double click on install application or exe
o The user should now click on ok tab
o Now, move to windows start menu
o And choose run
o The next step is to type control printers in the open field
o After that, click on ok tab to open printers and faxes
o Right click the amyuni document converter and choose rename tab
o The user should enter correct name according to the QuickBooks version installed in the pc and hit enter key.
- QuickBooks 2006-2009 R8: QuickBooks pdf converter
- QuickBooks 2009 R9 and later: PDF converter 3.0
- QuickBooks 2010 R1 and R2: PDF converter 2.0 QuickBooks
Now that you know the steps to be performed to reinstall QuickBooks pdf converter, it is time to implement the steps. However, if you have any query regarding the same, then do not think much in calling us at 1-800-761-1787. Our QuickBooks desktop support team will ensure to provide you with instant support services.
-
Posted in the topic Fix QuickBooks Error 6000 82 when opening company file in the forum SupportDecember 8, 2021 12:57 PM EST
Coming across some or the other error in QuickBooks is pretty much common, as it involves some or the other codes. This segment is going to brief you with the entire steps involved in fixing the QuickBooks error code 6000 82. This particular technical glitch is experienced due to any damaged or corrupted files in QuickBooks. It further indicates that the QuickBooks file cannot be located on another system in the network. Such an error can also be experienced if the data source name is damaged. This error appears with a warning message that says “An error occurred when QuickBooks tried to access the company file. Please try again.”

You can read this segment till the end, to find out the right steps involved in chucking off QuickBooks error code 6000 82. Or if you don’t want to manually rectify the error, then connecting with our professionals directly is recommended.
What triggers QuickBooks error code 6000 82?
This particular error can be experienced due to a handful of reasons, which include the below factors:
- You might experience the issue due to damaged company file.
- Another trigger can be if you aren’t able to find the company file on another system.
- Or if the QuickBooks installation of the system is encrypted.
- You might end up in such an error can be if you have made changes in the database name.
Measures that can be taken to fix QuickBooks error code 6000 82
You can implement the below stated steps and procedures to successfully fix the QuickBooks error code 6000 82.
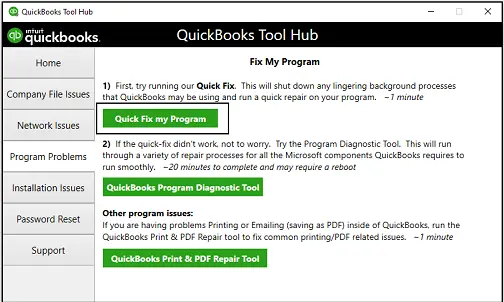
Measure 1: Running quick fix program on client system
- Initially you need to download and install the QuickBooks tool hub on the client system.
- Later on, choose program problems in QuickBooks tool hub.
- You now have to choose Quick fix my program option from the list.
- Conclude the process by starting QuickBooks desktop and then open the data file.
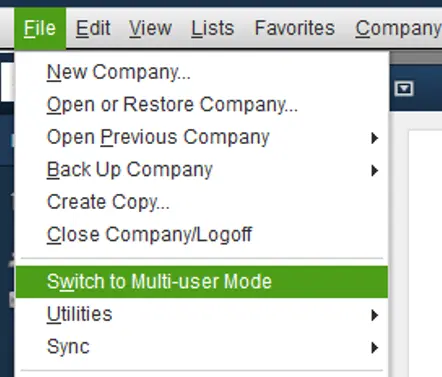
Measure 2: Switching to the mode hosting local and remote files for multiple user access
- Start with opening QuickBooks and press F2 key to open the product information window.
- You now have to check that the local server information towards the bottom of the window has hosting set to local files.
- Heading forward, click on file menu and then pick switch to multi-user mode.
- Later on, open the company file and press F2 key on network system for product information window to open.
- To complete the process, you need to check under the local server information and ascertain that the hosting is set to local files.
This piece of writing is written with an intent to provide the best possible information related to fixing QuickBooks error code 6000 82.
However, if you are still doubtful or if you are unable to fix the issue in QuickBooks desktop, then in that case it is suggested to reach out to our accounting professionals using our QuickBooks error support helplinei.e. 1-800-761-1787.
-
Posted in the topic QuickBooks Balance Sheet Out of Balance Issue in the forum SupportDecember 6, 2021 12:15 AM EST
Want to know the fixation procedures for balance sheet out of balance error? Well, in that scenario, you have landed at the right place. The total assets should match the total liabilities on the balance sheet, and when these two doesn’t tally, it directly indicates balance sheet out of balance error. Balance sheet reports can often be tricky, and it is highly recommended to ask the bookkeeper or the accountant for any help instead of continuing further.
Whereas, if you are interested in finding out the right set of steps to fix the QuickBooks balance sheet out of balance error, then in that case it is recommended to either scroll through this segment carefully, or you can also connect with our technocrats using our dedicated helpline. Our tech geeks will be more than happy to assist you in rectifying the error from its root cause.
Steps to eliminate balance sheet out of balance error in QuickBooks desktop
Below are the steps that can be performed to eliminate balance sheet out of balance error in QuickBooks desktop. Let us have a look:
Step 1: Running the report in accrual basis
- You simply have to choose company and financial from the report’s menu and then the balance sheet summary
- Furthermore, choose customize report
- And also choose accrual on the display tab under report basis

- You are then required to hit ok tab
Step 2: Look for the date when the balance sheet went out of balance
- You need to first move to reports menu and choose company and financials and then the balance sheet summary
- After that, choose customize report
- Moreover, from the date’s dropdown choose all tab on the display tab
- Move to the reports basis section
- In the columns section, select year and hit ok tab
- Compare the total assets to the liabilities. And look for the point where your balance sheet went out of balance
Step 3: Finding the transactions that are making the balance sheet out of balance
Step 4: Re-dating the transactions
Step 5: Eliminate and re-enter the transactions
Towards the end of this piece of writing, we expect that the above stated steps are more than enough to tackle through the QuickBooks balance sheet out of balance error.
However, if you are having any query, or if you need any of our assistance in chucking off the error, then do not think much in connecting with our 24/7 QuickBooks error support personnel using our support line i.e., 1-800-761-1787.
-
Posted in the topic Get Rid of from QuickBooks Web Connector Error QBWC1085 in the forum SupportNovember 27, 2021 5:23 AM EST
Stumbled upon QuickBooks web connector error QBWC1085 and don’t know how to deal with it? Well, this is one of the commonly reported errors and users find it pretty difficult to resolve the QuickBooks web connector error QBWC1085. This error is basically related to the log file of QuickBooks and is seen when the user tries to open the company file and restricts to write the log files.
In this post, we are going to discuss the causes and fixes to the QuickBooks web connector error QBWC1085. However, if you feel the need of expert assistance, or if you are seeking for professional guidance, feel free to call us and talk to our QuickBooks support team and discuss your issue with them.
Triggers to the web connector error QBWC1085
- QuickBooks is unable to write to the web connector log file.
- Damaged web connector program uses TXT file.
- Or, if the web connector is trying to get information to the QuickBooks from a third-party web based program.
- Damaged components can also be one of the triggers.
Steps to resolve the QuickBooks Web Connector Error QBWC1085
The error can be easily resolved by carrying out the steps below:
Step 1
- Firstly, the user needs to press windows + R keys.
- And then, open the run window.
- After that, the user needs to type msconfig and click ok.
- Also, click on the startup tab.
- And then spot and mark the checkbox for QuickBooks web connector.
- Hit apply and ok.
- Now restart the system.
Step 2
- Open the taskbar and right click the web connector icon.
- And then hit exit and open windows file manager.
- Visit the C:\ProgramData\Intuit\QBWebConnector\log folder.
- And right click the QWCLOG.TXT and select the rename option.
- Change the name of the file and save it.
- Reboot the web connector program.
- And reboot the system.
Carrying out the above stated steps can help the user in resolving this QuickBooks web connector error QBWC1085 issue up to great extent. However, in case of any query, or if you feel the need of expert guidance, you can make a call at our toll-free number 1-800-761-1787, and ask our experts to resolve the error for you.
-
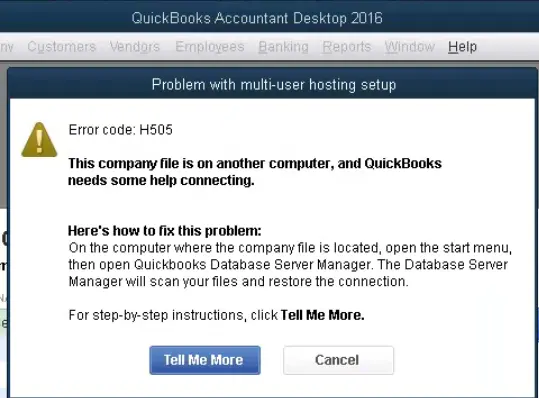
Posted in the topic What Causes QuickBooks Error H505 and How to Debug It? in the forum SupportNovember 16, 2021 4:53 AM EST
Landing into some or the other error is quite common in QuickBooks, as it is prone to different technical glitches. One such error you might come across can be QuickBooks error code H505. This particular error might be experienced when you try to get the company files or data on another system and that particular system isn’t having proper establishment setup or the system needs additional installation or setup. You might bump into such an error as a consequence of one or more user systems being set as QuickBooks server. The best part of QuickBooks is that every error encountered in QuickBooks can be rectified by performing some steps.
You might see the following error message on your desktop screen:
“QuickBooks has faced a problem and needs to close. Sorry for any inconvenience caused”.
You can read this segment with full concentration to resolve this QuickBooks error code H505 successfully. Whereas, if you aren’t interested in performing the steps manually, then you can connect with our professionals using our helpline.
What leads to QuickBooks error code H505?
You can bump into such an error due to the following reasons:
- One of the basic reasons can be wrong DNS settings.
- Also, if the QuickBooksDBXX service isn’t running, then such an error is probable to occur.
- You might come across similar issue if the hosting configuration setting aren’t proper.
- If the firewall is blocking the incoming and outgoing communication of the software.
- Another trigger for the same can be damaged or missing .nd file
Steps to rectify the QuickBooks error code H505
You can try fixing the QuickBooks multi-user error message H505 issue by editing the host file. The steps for editing the host file are as follows:
- Start with simply pressing Windows + R keys for opening the run window.
- Type in cmd, and hit enter to open command prompt.
- Type ipconfig/all and hit enter tab to run the command.
- Write down the hostname and IP address and repeat the same steps for multi-user setup.
Edit windows host file
- You would initially have to shut down QuickBooks and move to start menu.
- Move to this PC tab and ascertain to access C:\Windows\system32\drivers\etc or C:\windows\ syswow64\drivers\etc
- Follow the hidden files and folders.
o This can be done by clicking on view tab.
o Also click on hidden items.
o Right click the hosts file and go for open with and open it with notepad.
o Fill in the IP address and system name.
o Use the tab key to put spaces between IP address and system name.
o Save changes and reopen QuickBooks in multi-user mode.

Fixing the QuickBooks multi-user error code H505 can be a little easy for you, once the above stated set of steps are implemented. Whereas, if you aren’t able to rectify the issue even after performing the set of steps mentioned in above, then in that scenario connect with our QuickBooks enterprise technical support geeks using our support line i.e., 1-800-761-1787.